NBA 2K24 Evolution Cards Requirements List EVO MyTEAM Best Playoff
Evolution cards can be upgraded by completing statistical milestones unique to each card. The card's attributes, badges, hot zones, animations, and eligible positions can improve as the level. Some cards will even allow you to choose from two different sets of upgrades to evolve a card to your own play style.
Evolution cards can be upgraded into better versions of that player.
List of NBA 2K24 Evolution Cards Requirements
| NAME | POS | OVR | OFF | DEF | HEI | WNG | WGH | BADGES |
|---|---|---|---|---|---|---|---|---|
| Luka Doncic Season 3/New Year's Resolution | PG/SG | 95 | 99 | 87 | 6'7" | 6'11" | 230 lbs | 6, 3, 24, 14 |
| Klay Thompson Season 3/New Year's Resolution | SG/SF | 95 | 96 | 96 | 6'6" | 6'9" | 220 lbs | 0, 6, 17, 14 |
| D'Angelo Russell Season 3/New Year's Resolution | PG/SG | 94 | 99 | 85 | 6'4" | 6'9" | 198 lbs | 0, 5, 21, 11 |
| Dirk Nowitzki Season 3/New Year's Resolution | PF/C | 94 | 98 | 89 | 7'0" | 7'3" | 245 lbs | 0, 8, 14, 10 |
| Blake Griffin Season 3/New Year's Resolution | PF/C | 94 | 99 | 88 | 6'9" | 6'11" | 251 lbs | 3, 9, 18, 9 |
| Jordan Poole Season 3/New Year's Resolution | SG/PG | 91 | 94 | 82 | 6'4" | 6'6" | 194 lbs | 3, 6, 22, 3 |
| Dennis Rodman Season 3/New Year's Resolution | PF/SF | 91 | 84 | 99 | 6'7" | 7'3" | 220 lbs | 1, 3, 18, 3 |
| Dikembe Mutombo Season 3/New Year's Resolution | C | 91 | 84 | 98 | 7'2" | 7'6" | 250 lbs | 0, 1, 16, 2 |
| Dwight Howard Season 2/Level Up Dwight | C/PF | 91 | 87 | 99 | 6'10" | 7'4" | 265 lbs | 0, 4, 13, 2 |
| Shawn Kemp Season 1/Season 1 Rewards | PF/C | 90 | 91 | 89 | 6'10" | 7'1" | 230 lbs | 0, 0, 11, 2 |
| Gilbert Arenas Season 2/S2 Level Up | PG/SG | 90 | 92 | 88 | 6'4" | 6'9" | 191 lbs | 4, 10, 17, 1 |
| Pau Gasol Rewards/Domination Reward | PF/C | 90 | 90 | 88 | 7'0" | 7'4" | 250 lbs | 6, 8, 4, 1 |
| Kenyon Martin Season 3/New Year's Resolution | PF/C | 89 | 89 | 93 | 6'9" | 7'0" | 225 lbs | 2, 3, 21, 0 |
| Patrick Beverley Season 3/New Year's Resolution | PG/SG | 89 | 81 | 99 | 6'2" | 6'6" | 180 lbs | 0, 3, 19, 0 |
| JJ Redick Season 3/New Year's Resolution | SG/SF | 89 | 91 | 83 | 6'3" | 6'3" | 190 lbs | 3, 3, 17, 0 |
| Nikola Jokic '23-'24 NBA Season/NBA Primetime | C | 88 | 89 | 72 | 6'11" | 7'3" | 284 lbs | 20, 9, 4, 0 |
| Jalen Brunson '23-'24 NBA Season/NBA Primetime | PG/SG | 88 | 88 | 82 | 6'2" | 6'4" | 190 lbs | 12, 14, 2, 0 |
| Luka Doncic '23-'24 NBA Season/NBA Primetime | SF/PG | 88 | 88 | 77 | 6'7" | 6'8" | 230 lbs | 20, 14, 0, 0 |
| Jayson Tatum '23-'24 NBA Season/NBA Primetime | SF/PF | 88 | 87 | 84 | 6'8" | 6'10" | 210 lbs | 19, 7, 0, 0 |
| Jimmy Butler '23-'24 NBA Season/NBA Primetime | SF/PF | 88 | 85 | 87 | 6'7" | 6'8" | 230 lbs | 21, 5, 0, 0 |
| Dale Ellis Season 2/S2 Level Up | SG/SF | 87 | 90 | 79 | 6'7" | 6'10" | 205 lbs | 6, 6, 9, 0 |
| Mitch Richmond Season 1/Level Up | SG/SF | 87 | 88 | 77 | 6'5" | 6'8" | 215 lbs | 4, 5, 8, 0 |
| Nah'Shon Hyland Season 3/New Year's Resolution | PG/SG | 86 | 87 | 85 | 6'2" | 6'9" | 169 lbs | 0, 1, 17, 0 |
| Mitchell Robinson Season 3/New Year's Resolution | C | 86 | 83 | 95 | 7'0" | 7'2" | 240 lbs | 0, 5, 13, 0 |
| Herbert Jones Season 3/New Year's Resolution | SG/SF | 86 | 78 | 98 | 6'7" | 7'0" | 206 lbs | 0, 9, 12, 0 |
| Shaquille O'Neal Season 3/Season 3 Rewards | C | 86 | 84 | 83 | 7'1" | 7'7" | 325 lbs | 3, 12, 1, 0 |
| Ausar Thompson Season 1/Level Up | SG/SF | 85 | 85 | 87 | 6'7" | 7'0" | 205 lbs | 1, 12, 4, 0 |
| Rudy Tomjanovich Season 1/Level Up | SF/PF | 85 | 85 | 83 | 6'8" | 6'10" | 218 lbs | 5, 3, 4, 0 |
| Harrison Barnes Season 2/S2 Level Up | SF/PF | 85 | 87 | 84 | 6'8" | 6'11" | 225 lbs | 12, 9, 3, 0 |
| Derrick White Season 2/NBA Tournament Battles | SG/PG | 82 | 79 | 88 | 6'4" | 6'7" | 190 lbs | 3, 1, 6, 0 |
| Naz Reid Season 2/NBA Tournament Battles | C/PF | 82 | 79 | 83 | 6'9" | 7'3" | 264 lbs | 2, 0, 5, 0 |
| Dorian Finney-Smith Season 2/NBA Tournament Battles | PF/SF | 82 | 80 | 85 | 6'7" | 7'0" | 220 lbs | 9, 6, 4, 0 |
| Malik Monk Season 2/NBA Tournament Battles | SG/SF | 82 | 85 | 73 | 6'3" | 6'5" | 200 lbs | 5, 5, 4, 0 |
| Dee Brown Season 1/Level Up | PG/SG | 82 | 83 | 78 | 6'2" | 6'4" | 160 lbs | 2, 10, 3, 0 |
| Kentavious Caldwell-Pope Season 2/NBA Tournament Battles | SG/SF | 82 | 83 | 81 | 6'5" | 6'8" | 204 lbs | 9, 6, 3, 0 |
| Josh Okogie Season 2/NBA Tournament Battles | SF/SG | 82 | 81 | 86 | 6'4" | 7'0" | 213 lbs | 3, 6, 3, 0 |
| Kevon Looney Season 2/NBA Tournament Battles | C/PF | 82 | 81 | 82 | 6'9" | 7'3" | 222 lbs | 1, 4, 3, 0 |
| Jonas Valanciunas Season 2/NBA Tournament Battles | C | 82 | 83 | 81 | 6'11" | 7'3" | 265 lbs | 5, 2, 3, 0 |
| Desmond Mason Season 1/Level Up | SF/SG | 82 | 82 | 80 | 6'5" | 6'8" | 222 lbs | 5, 2, 3, 0 |
| Jarred Vanderbilt Season 2/NBA Tournament Battles | PF/C | 82 | 78 | 87 | 6'8" | 6'11" | 214 lbs | 3, 2, 3, 0 |
| Josh Hart Season 2/NBA Tournament Battles | SF/SG | 82 | 82 | 81 | 6'4" | 6'8" | 215 lbs | 5, 1, 2, 0 |
| Charlie Villanueva Season 2/S2 Level Up | PF/C | 82 | 84 | 78 | 6'11" | 7'0" | 232 lbs | 4, 1, 2, 0 |
| Amen Thompson Season 2/NBA Tournament Battles | SG/SF | 82 | 84 | 85 | 6'7" | 7'0" | 200 lbs | 3, 1, 2, 0 |
| Mark Williams Season 2/NBA Tournament Battles | C | 82 | 79 | 85 | 7'0" | 7'7" | 240 lbs | 6, 0, 2, 0 |
| Caleb Martin Season 2/NBA Tournament Battles | PF/SF | 82 | 83 | 79 | 6'5" | 6'10" | 205 lbs | 0, 12, 1, 0 |
| Caris LeVert Season 2/NBA Tournament Battles | SG/SF | 82 | 84 | 77 | 6'6" | 6'10" | 205 lbs | 3, 9, 1, 0 |
| Jaylin Williams Season 2/NBA Tournament Battles | C/PF | 82 | 82 | 79 | 6'9" | 7'1" | 240 lbs | 2, 7, 1, 0 |
| Talen Horton-Tucker Season 2/NBA Tournament Battles | SG/SF | 82 | 83 | 79 | 6'4" | 7'1" | 234 lbs | 7, 5, 1, 0 |
| Josh Green Season 2/NBA Tournament Battles | SF/SG | 82 | 83 | 83 | 6'7" | 6'10" | 200 lbs | 4, 4, 1, 0 |
| De'Andre Hunter Season 2/NBA Tournament Battles | SF/PF | 82 | 82 | 84 | 6'8" | 7'2" | 221 lbs | 6, 3, 1, 0 |
| Bobby Portis Jr. Season 2/NBA Tournament Battles | C/PF | 82 | 82 | 78 | 6'11" | 7'2" | 250 lbs | 8, 1, 1, 0 |
| Gary Trent Jr. Season 2/NBA Tournament Battles | SG/SF | 82 | 83 | 77 | 6'5" | 6'9" | 209 lbs | 6, 8, 0, 0 |
| Bennedict Mathurin Season 2/NBA Tournament Battles | SG/SF | 82 | 83 | 78 | 6'5" | 6'8" | 210 lbs | 4, 8, 0, 0 |
| Anfernee Simons Season 2/NBA Tournament Battles | SG/PG | 82 | 85 | 74 | 6'3" | 6'9" | 181 lbs | 11, 7, 0, 0 |
| Tobias Harris Season 2/NBA Tournament Battles | SF/PF | 82 | 84 | 75 | 6'7" | 6'11" | 226 lbs | 9, 5, 0, 0 |
| Wendell Carter Jr. Season 2/NBA Tournament Battles | C/PF | 82 | 83 | 81 | 6'10" | 7'3" | 270 lbs | 4, 5, 0, 0 |
| Norman Powell Season 2/NBA Tournament Battles | SF/SG | 82 | 83 | 78 | 6'4" | 6'11" | 215 lbs | 11, 1, 0, 0 |
| Clark Kellogg Rewards/Domination Reward | PF/C | 81 | 82 | 75 | 6'7" | 7'4" | 250 lbs | 4, 2, 3, 0 |
| Terrell Brandon Rewards/Domination Reward | PG/SG | 81 | 81 | 76 | 5'11" | 6'3" | 180 lbs | 3, 4, 1, 0 |
| Otis Birdsong Rewards/Domination Reward | SG/PG | 81 | 81 | 76 | 6'3" | 6'4" | 190 lbs | 9, 3, 1, 0 |
| Paul Westphal Rewards/Domination Reward | SG/SF | 81 | 80 | 75 | 6'4" | 6'7" | 197 lbs | 5, 11, 0, 0 |
| Doc Rivers Rewards/Domination Reward | PG/SG | 81 | 81 | 77 | 6'4" | 6'7" | 185 lbs | 7, 3, 0, 0 |
| James Silas Rewards/Domination Reward | SG/PG | 81 | 81 | 79 | 6'1" | 6'4" | 180 lbs | 10, 0, 0, 0 |
| Anderson Varejao Season 1/Starter | C/PF | 79 | 77 | 77 | 6'11" | 7'3" | 230 lbs | 2, 2, 4, 0 |
| JJ Redick Season 1/Starter | SG/SF | 79 | 80 | 68 | 6'3" | 6'3" | 190 lbs | 4, 3, 3, 0 |
| Brian Scalabrine Season 1/Starter | PF/SF | 79 | 80 | 65 | 6'9" | 6'9" | 241 lbs | 5, 3, 2, 0 |
| Ricky Rubio Season 1/Starter | PG/SG | 79 | 79 | 71 | 6'2" | 6'7" | 190 lbs | 2, 6, 1, 0 |
| Fred Jones Season 1/Starter | SG/SF | 79 | 80 | 77 | 6'2" | 7'0" | 218 lbs | 2, 4, 1, 0 |
| Tre Mann Rewards/Domination Reward | PG/SG | 79 | 79 | 71 | 6'3" | 6'4" | 178 lbs | 3, 7, 0, 0 |
| Rafer Alston Season 1/Starter | PG/SG | 79 | 80 | 71 | 6'2" | 6'4" | 171 lbs | 13, 6, 0, 0 |
| Larry Nance Jr. Rewards/Domination Reward | C/PF | 79 | 78 | 75 | 6'8" | 7'2" | 245 lbs | 2, 6, 0, 0 |
| Gary Harris Rewards/Domination Reward | SG/SF | 79 | 77 | 76 | 6'4" | 6'6" | 210 lbs | 6, 5, 0, 0 |
| Tyrone Hill Season 1/Level Up | PF/C | 79 | 76 | 78 | 6'9" | 7'0" | 240 lbs | 5, 4, 0, 0 |
| Udonis Haslem Season 1/Starter | C/PF | 79 | 79 | 71 | 6'7" | 6'11" | 235 lbs | 5, 4, 0, 0 |
| Andre Drummond Season 1/Starter | C | 79 | 78 | 78 | 6'11" | 7'6" | 279 lbs | 4, 4, 0, 0 |
| Kenyon Martin Season 1/Starter | PF/C | 79 | 81 | 78 | 6'9" | 7'0" | 225 lbs | 8, 3, 0, 0 |
| Jason Terry Season 1/Starter | PG/SG | 79 | 80 | 70 | 6'2" | 6'5" | 180 lbs | 8, 3, 0, 0 |
| Charlie Ward Season 1/Level Up | PG/SG | 79 | 78 | 80 | 6'2" | 6'6" | 190 lbs | 6, 3, 0, 0 |
| Jeremy Lin Season 1/Starter | PG/SG | 79 | 79 | 73 | 6'3" | 6'5" | 200 lbs | 6, 3, 0, 0 |
| Patrick Beverley Season 1/Starter | PG/SG | 79 | 77 | 82 | 6'2" | 6'6" | 180 lbs | 4, 3, 0, 0 |
| Fred VanVleet Season 1/Starter | PG/SG | 79 | 78 | 76 | 6'0" | 6'2" | 197 lbs | 11, 2, 0, 0 |
| Mike Bibby Season 1/Starter | PG/SG | 79 | 80 | 71 | 6'2" | 6'4" | 190 lbs | 10, 2, 0, 0 |
| Josh Smith Season 1/Starter | PF/SF | 79 | 78 | 78 | 6'9" | 7'0" | 225 lbs | 10, 2, 0, 0 |
| Alex Caruso Season 1/Starter | SG/SF | 79 | 75 | 81 | 6'5" | 6'5" | 186 lbs | 9, 2, 0, 0 |
| Jae Crowder Rewards/Domination Reward | PF/SF | 79 | 77 | 77 | 6'6" | 6'8" | 235 lbs | 7, 2, 0, 0 |
| David West Season 1/Starter | PF/C | 79 | 79 | 67 | 6'9" | 7'4" | 250 lbs | 7, 2, 0, 0 |
| Bruce Brown Season 1/Starter | SG/SF | 79 | 78 | 78 | 6'4" | 6'9" | 202 lbs | 4, 2, 0, 0 |
| Ivica Zubac Rewards/Domination Reward | C | 79 | 78 | 72 | 7'0" | 7'3" | 240 lbs | 3, 2, 0, 0 |
| Kemba Walker Season 1/Starter | PG/SG | 79 | 81 | 73 | 6'0" | 6'3" | 184 lbs | 14, 1, 0, 0 |
| Steven Adams Season 1/Starter | C | 79 | 77 | 78 | 6'11" | 7'4" | 265 lbs | 10, 1, 0, 0 |
| Danny Green Season 1/Starter | SF/SG | 79 | 78 | 78 | 6'6" | 6'10" | 215 lbs | 10, 1, 0, 0 |
| Evan Turner Season 1/Starter | SF/SG | 79 | 80 | 73 | 6'6" | 6'8" | 205 lbs | 9, 1, 0, 0 |
| Monta Ellis Season 1/Starter | SG/SF | 79 | 79 | 72 | 6'3" | 6'2" | 185 lbs | 8, 1, 0, 0 |
| Tony Allen Season 1/Starter | SF/SG | 79 | 74 | 80 | 6'4" | 6'9" | 213 lbs | 7, 1, 0, 0 |
| Gordon Hayward Season 1/Starter | SF/PF | 79 | 80 | 75 | 6'7" | 6'7" | 225 lbs | 2, 1, 0, 0 |
| John Wall Season 1/Starter | PG/SG | 79 | 79 | 76 | 6'3" | 6'9" | 210 lbs | 9, 0, 0, 0 |
| Donte DiVincenzo Season 1/Starter | SG/SF | 79 | 78 | 79 | 6'4" | 6'6" | 203 lbs | 9, 0, 0, 0 |
| Nicolas Batum Season 1/Starter | PF | 79 | 78 | 74 | 6'8" | 7'0" | 230 lbs | 8, 0, 0, 0 |
| Cedric Ceballos Season 1/Starter | SF/PF | 79 | 81 | 75 | 6'7" | 6'9" | 225 lbs | 6, 0, 0, 0 |
| Mitchell Robinson Rewards/Domination Reward | C | 79 | 76 | 78 | 7'0" | 7'2" | 240 lbs | 2, 0, 0, 0 |
| Jay Williams Season 1/Starter | PG/SG | 79 | 77 | 80 | 6'2" | 6'5" | 175 lbs | 0, 0, 0, 0 |
| Zach LaVine Season 3/Season 3 Rewards | SG/SF | 76 | 77 | 70 | 6'5" | 6'8" | 200 lbs | 6, 0, 0, 0 |
| DeMar DeRozan Season 3/Season 3 Rewards | SF/SG | 67 | 71 | 59 | 6'6" | 6'9" | 220 lbs | 2, 0, 0, 0 |
Buy NBA 2K24 VC
- Buy NBA 2K24 VC. Fast Delivery. Cheap Prices. Safety Guaranteed.
Card Description
Each bolt on the side of an Evolution card represents an upgrade level that card can achieve by completing goals to evolve. Some evolution levels will allow you to choose between two sets of bonuses. You can find the evolution requirements and track your progress in the CARD EVOLUTION menu on the MyTEAM tab of the main menu.
Evolution Cards are available in rewards, auction house, and packs. 2K users can upgrade an evolution card to a better version and become more powerful. By finishing some goals, the evolution card will evolve. The star on the side of an Evolution card represents an upgrade level that card can obtain. In the CARD EVOLUTION menu on the MyTEAM tab of the main menu, you can see the evolution requirements and track your upgrading progress.
Avaiable in: PACKS, REWARDS, AUCTION HOUSE.
Customizable NBA 2K24 Evolution Cards
Evolution Cards was clearly one of our star additions to the NBA 2K20 MyTEAM experience. The ability to obtain cards and power them up to higher gem tiers felt very rewarding as it gave people a chance to build some sweat equity with their collections. Evolution Cards are back in NBA 2K24, and better than ever!
New to NBA 2K24, you will now have more control over how some of your Evolution Cards evolve as they tier up. That is because we are introducing the concept of branching in the evolution process! When you have an evo card that reaches a choice tier, you will make a selection between two badges that you want to focus on adding to the given card. Let’s use a real example here to dive into this further. Spoiler: the venerable Shaquille O’Neal is one of our Starter Pack options this year ( this means you can choose to start with a free Shaq card in 2K21!). One of his evolution tiers is going to offer you the choice between Rebound Chaser (improved rebounding ability) and Rim Protector (better shot blocking ability). It’s a tough choice. Do you want your Shaq to be a better rebounder, or more menacing around the rim? Based on the badge you choose to chase, the requirement to upgrade it will update accordingly.
This means that not all fully evolved Evolution Cards will be identical in NBA 2K24, and I think that is a fantastic thing. MyTEAM is a mode about fantasy. A mode about user choice and customization. The addition of Customizable Evolutions to the game this year takes us that one step further to differentiating player lineups and gives you yet another tool to give your team the edge out there on the courts. I can’t wait to see the choices you will all make this year. We’ve got some crafty ideas planned!
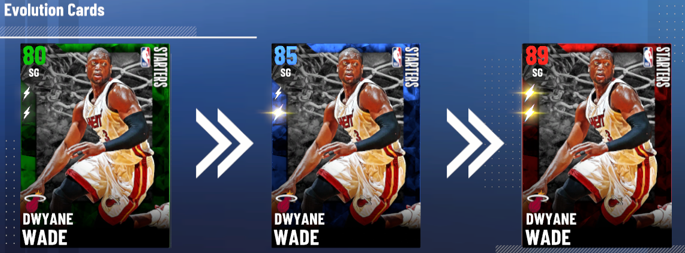
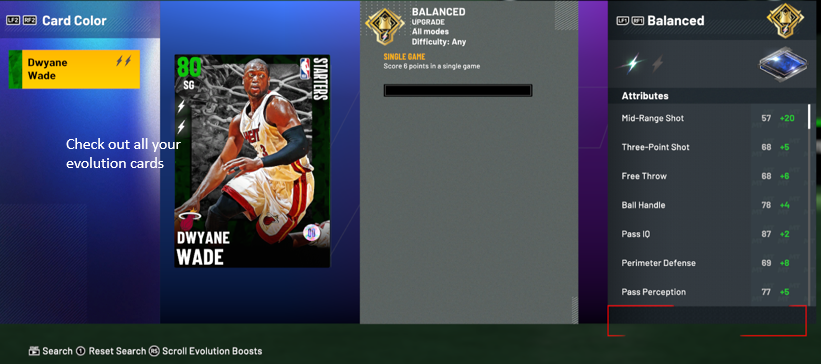
Evolution Card Example
- From the left menu, you can check out all your evolution cards.
- In the center, you can track the requirements to evolve each card. For the card in the following example, it needs to score 6 points in a single game.
- In the right, you can even check out the attributes and badges you will upgrade when you evolve. As the example shown below, the evolved cards will have +20 Mid-Range Shot, +5 Three-Point Shot, etc.
Some evolutions allow you to choose how you want to upgrade your player offering different attributes boosts, badges, hot zones, and even animations based on which path you choose.
Note that Evolution cards will not be eligible for badge customization.
Starter Cards
Starter cards are Evo cards picked when you create your MyTEAM. After your first MyTEAM game you earned a Starter Card. You can fully evolve your first Starter card right away to earn another one! Check out the CARD EVOLUTION menu for the requirements to get started.
- Available Through: Starter Option Pack
NBA 2K24 MyTEAM Evolution "EVO" Card Guide
How to use evolution card in NBA 2K24 myteam
Most of the cards you get in NBA 2K24 MyTEAM are static. For example, they arrive from their wrappers as emerald cards or sapphire cards and remain the same. The Player's stats and badges are locked. You can apply shoes to artificially inflate the card's properties, but you cannot change the card on a fundamental level or its color permanently at all.
But evolution cards can do that. By reaching a specified benchmark (a specific number of points in the game, or a specific number of blocks over the course of several games), your evolution card can upgrade its color, skill ratings, and gain a badge. Some evolution cards can be upgraded once or twice. Others can be upgraded up to five times. It all depends on the specific card.
The first time you start MyTEAM, you'll get one of five Evolution cards: Tracy McGrady, Derrick Rose, Dirk Nowitzki, Vince Carter or Hakeem Olajuwon. The Olajuwon card has been upgraded from Emerald to Sapphire; it can be upgraded to Ruby again (as shown in the space star on the left). The best evolution card can have up to five stars (Level 5 upgrade).
You can learn a lot by looking at the CARD EVOLUTION menu on the MyTEAM tab, where you can select card evolution. In the middle is the evolution requirement, which shows how many rebounds and points you need to evolve this card. On the right is a preview of what the card's boosts will be when the card finally evolved.
Some evolution cards can obtain badges when you evolve. For example, Cedric Ceballos' next upgrade to Ruby will win two gold shooting badges. When deciding whether to spend time developing an evolution card, make sure the end product is worth your evolving.
You can unlock the evolution card for free by winning the game in Triple Threat mode; for example, winning 50 times will bring you the ruby "Darius miles".
The easiest way to get an evolution card is to play in a Domination mode. If you play on all-star difficulty, you will get an evolution card for winning it. It's a top priority to unlock Alex Caruso (19 Gold badges), whom you get for beating the Lakers, and Terrance Ferguson (18 Gold badges and 2 Hall of Fame badges), whom you obtain after beating Oklahoma City.
Can you upgrade your MyPlayer in MyTeam 2K22?
VC will not be a major part of your plan when you are not willing to spend real money in the MyTeam mode. However, you can still make money and consume VC in MyTeam, which is earned by playing other modes. NBA 2K24 mt coins is the standard currency in MyTEAM mode.
MyCareer, Play Now Online, MyGM, MyLeague, and other modes can reward players with VC. In addition to MyCareer, some players are against using any VC in any mode. In the past few years, this approach has some truth, but for NBA 2K24, this approach is not so wise.
After upgrading your MyPlayer to 95, the improvement of its overall score mainly depends on the quality of play. As a result, it reduces the burden of VC and is free to choose to use it in MyTeam.
If you are willing to use some of your hard-earned VC in MyTeam, please determine how much you are willing to use in this mode and how much you save for MyCareer. Maybe you want to split 50-50 or even 70-30?
Since VC will not be the main currency of the MyTeam plan, I suggest that 70-30 or even 75-25 should be allocated to VC for a smaller amount.
Related Madden Coins Guide
- Abyssal Incubator PoE – Rare Abyss Item
- The Retch PoE Build & Price – Rustic Sash
- Shaper’s Orb Best Maps 4.0 – PoE
- PoE Unique Gloves List – Best Unique Gloves in PoE
- Star of Wraeclast Build Guide & Price – PoE Ruby Amulet
- The Flow Untethered Build Guide & Price – POE Cloth Belt
- Serrated Fossil Crafting Mods & Farming Drop Location
- Hollow Fossil Crafting Mods – Drop Location
- Orb of Chance POE: Odds, VS Orb of Alchemy, StrongBox, PoE Orb of Chance Best Use 2019
- Portentous Delirium Orb – PoE Prophecy Items Delirium Currency 3.10
- Play everything in NBA 2K24 for more MT coins
- How to get wow gold classic?
- PoE Uul-Netol’s Breachstone Guide & Drops – Splinter of Uul-Netol
- Fury Valve – PoE Jade Amulet Build Guide
- Tear of Purity Build Guide & Price – PoE Lapis Amulet