PoE Atlas Guide
PoE Atlas Guide
| Step | Image | Mechanic |
|---|---|---|
| 1 | 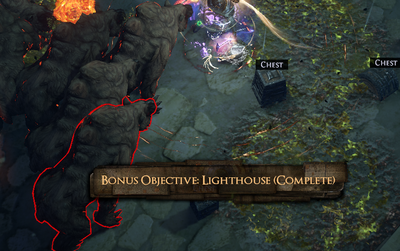 |
In order to complete your atlas, the first step is to complete all the maps. Maps are completed when you kill the map boss for the first time.
The message on the left shows after you have been granted the Bonus for a map by killing the boss of a Magic or higher version of the map. |
| 2 | 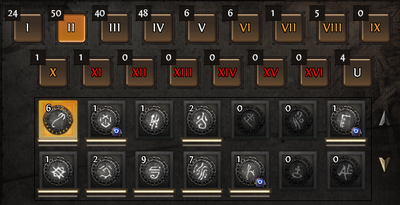 |
If you have the map stash tab, the indicator lines under a map tell you which bonus you have obtained:
|
| 3 | 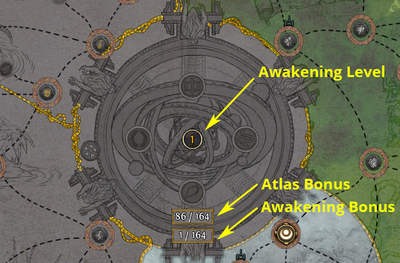 |
Open your Atlas to see the number of maps for which you have the Atlas Bonus (first number) and Awakening Bonus (second number). |
| 4 | 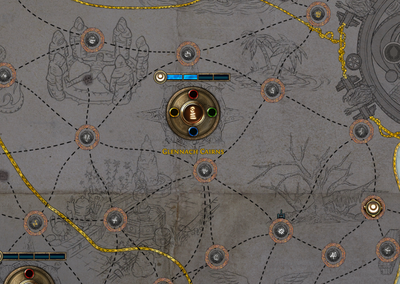 |
Begin by completing all the white maps at least once. This means all the maps from Tier 1 to Tier 5.
Therefore, you need to run or obtain any map that does NOT have the indicator lines in the map stash tab. If you open your Atlas after running all ~80 white maps, it should look like this image. All maps should appear, and all should be interconnected to the other. |
| 5 |  |
As you are running the maps you will encounter the conquerors from time to time. Talk to Kirac and Zana to defeat them and obtain watchstones. Socket at least one watchstone in every region.
After running all ~80 white maps, you should have between 4 to 8 watchstones in total. If you have none it’s fine, but it means you failed to fight the conquerors and slowed down your atlas progression. |
| 6 | 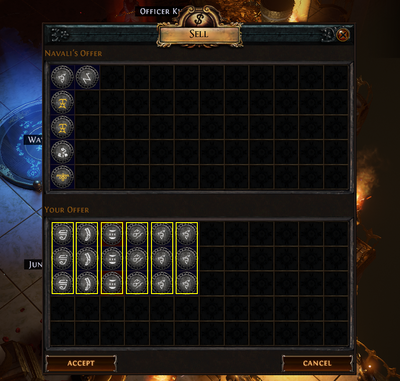 |
Now that you don’t need your white maps, collect sets of 3 of the same map (white maps), and vendor them for 1 map of the higher tier.
Tier 5 white maps will convert into Tier 6 yellow maps. |
| 7 | 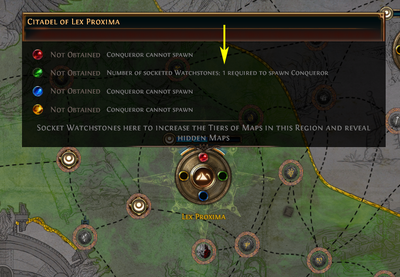 |
The next step is to complete all yellow maps.
To do this, craft 5-10 maps at a time from a single region. Make them at least Rare if you cannot yet run Corrupted Rare. Before running the maps, roll over the region’s citadel in the Atlas and ensure you have the correct number of watchstones socketed (the best is to have 4 watchstones socketed). If you have less watchstones, take it out from other regions and place it into this one. Tip: Socket in 4 watchstones in a region’s citadel before running yellow/red maps in that region, in order to obtain higher tier maps within that region. |
| 8 | 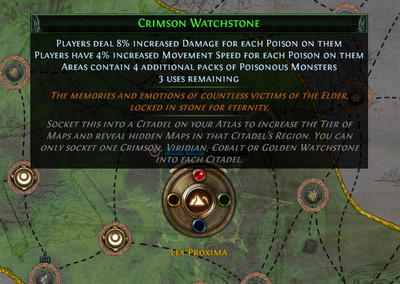 |
If you have sextants like Simple Sextant or Prime Sextant you can right-click the sextant and left-click on any watchstone to add mods to the watchstone. This usually increases mob sizes (more XP) and increases drops (more item quantity).
Rolling over a watchstone will show you the mods it has. If sextants are expensive, just use one, otherwise you can re-roll it many times to get the mod you want (if any). Tip: Consider saving watchstones with useful sextant modifiers until you reach a situation where the modifier will be most useful. For example, if you have a watchstone with the modifier 3 uses remaining |
| 9 |  |
Check Zana’s store daily for new maps. After you have completed the white maps, she will begin offering yellow and red maps. Buying from her store is often cheaper than buying from other players. |
| 10 | 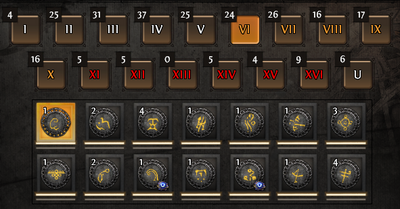 |
Now that you have completed all yellow maps, you should have obtained a large quantity of red maps as well (if you ran the Tier 10 yellow maps with 4 watchstones socketed in the region). If you don’t have any red maps, you can take some from friends or buy some, as seed maps to obtain more map drops.
Now repeat from step 6 to complete all red maps. If you wish you can run the maps specifically to chase conquerors (by running maps in the region where the conqueror is found). |
| 11 |  |
Once you have obtained the first four watchstones, you will be able to freely spawn the Conquerors in any of the regions by placing the watchstones in those regions.
For each cycle of 4 Conquerors you defeat, you will need 1 more watchstone socketed. Hovering over the storage sockets on the left of the atlas, or over each citadel will display which watchstones you still need to obtain in each region, and how many watchstones must be socketed to spawn each Conqueror. |
| 12 | 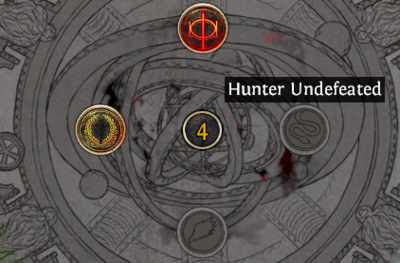 |
Once you have obtained 16 watchstones, the center of your Atlas will now have an indicator for which conquerors you have defeated in the current cycle.
The final step of the quest will require you to kill each Conqueror on a region with 4 watchstones socketed, which will finally allow you to fight Sirus, Awakener of Worlds, the final boss of the Conquerors of the Atlas expansion. After fighting Sirus once, you may keep repeating this cycle and eventually obtain up to 32 watchstones to fully upgrade your atlas. |
Buy PoE Currency Cheap
- Divine Orbs for Sale (6% off coupon: vhpg). Best site to buy PoE currency.
- Buy PoE Currency Instant Delivery (6% off coupon: poeitems). Path of Exile item and currency. Payment: PayPal, Skrill, Cryptocurrencies.
Path of Exile Guides & Tips
- Serus Uriel – Flyff Universe
- D2R Splendor Runeword
- Corpse Stitcher PoE Unique Heist Monsters 3.12 Challenge
- Tragedy Written in Stone — Lost Ark
- Infused PoE
- Blight-ravaged Strand Map PoE
- PoE Incursion Currency: Vial of Consequence Guide & Price
- Anomalous Arrow Nova Support PoE
- Shaping the Seas PoE
- Free Madden 20 Coins PS4, Xbox One, Glitch, Instant
- Hokantruba’s Temporary Sanity — Lost Ark
- Emperor’s Mastery PoE Farming Build 3.14
- Anomalous Berserk PoE
- Earthshatter PoE Build 3.11
- Divergent Cold Snap PoE