FFXIV Containment Bay P1T6 (Unreal) – FF14 6.3 New Unreal Trial
FFXIV Containment Bay P1T6 PATCH 6.3 New Unreal Trial
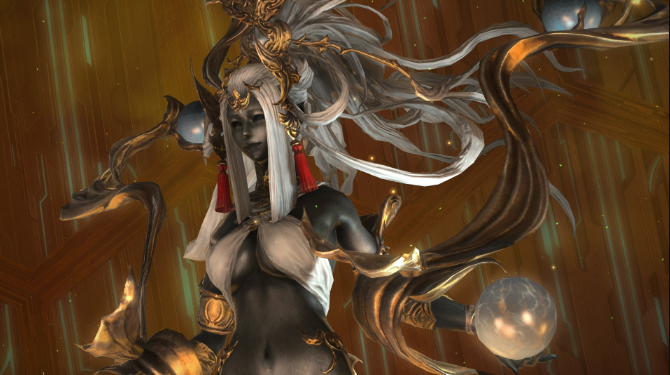
As ever, the faux commander craves tales of death-defying derring-do, and in a bid to satisfy him, you cast your mind back to your frenetic encounter with the eikon Sophia. The memory remains vivid even now, and you find yourself facing the Goddess once more, your very survival hanging in the balance…
Buy FFXIV Gil Cheap
- best place to buy FFXIV Gil . Payment: PayPal, Skrill, Cryptocurrencies.
Strategy
The Goddess: Sophia
Sophia utilizes the following moves and mechanics throughout a total of three phases.
Phase 1
- The fight begins with Thunder II, a large conal AoE aimed in the direction that Sophia is facing, immediately followed by Thunder III.
- Thunder III is a giant donut AoE emitted from Sophia with a safe spot just inside her hitbox. If players are far enough away, it can also be avoided by standing at max-range, depending on Sophia’s position.
- Players must also be wary of Aero II, a large AoE centred on Sophia that deals moderate damage and inflicts a knockback. While neither fatal nor particularly difficult to avoid, players should respect this mechanic later in the fight seeing as the rails on the side of the arena will eventually collapse, allowing players to fall out of the arena to their deaths.
- Daughter, the lower-half of Sophia, will occasionally disappear from beneath her and materialize at the edges of the arena. After doing so, it will charge up and fire a straight line-AoE called Light Dew across the platform.
- Sophia Rush is much like the Daughter attack used by her lower half. Sophia herself will move to the eastern or western edge of the arena and charge a huge straight line-AoE across the platform that must be avoided.
- Sophia will eventually create Proximity Markers under the feet of players that they must move away from to avoid as much damage as possible.
Phase 2
- Sophia begins this phase by casting Cloudy Heavens, making herself invulnerable and marking all players with Eternal Doom. This debuff can only be cleared by defeating three adds.
- If players are fatally injured while affected by Eternal Doom, they will become mindless zombies, attacking their fellow teammates with no control over their actions.
- The First Demiruge is a Paladin-based add that utilizes AoE attacks and a directional parry. Players who attack the wrong side during the parry-mechanic will be knocked away. Ideally, this add should be focused last.
- The Second Demiruge is a Healer-based add which will heal the other adds and also uses a gaze mechanic to confuse any players looking directly at it. Ideally, this add should be slain first.
- The Third Demiruge is a Lancer-based add that will eventually drop a persistent ice puddle on the ground at its current position. Ideally, this add should be positioned at the side of the arena to prevent the puddle from being too obstructive during Phase 3 and the rest of the current add-phase.
Phase 3
For the most part, Phase 3 is very similar to Phase 1, apart from a few new additions.
- From here on, it will now be possible to fall off the platform, though players that do so for any reason can still be resurrected after a brief delay.
- Sophia will eventually use Quasar, which creates tethers to the east and west of the platform. Each of these tethers will spawn a meteor that will slowly fall towards a set of scales on both sides of the platform. Players must determine which side of the arena is safe by calculating the ‘weight’ of the meteors and moving to the side that weighs the least. On collision, the arena will tilt towards the side that weighs the most and send players sliding in that direction. The larger the weight-difference, the further players will slide.
- There are two types of Meteors that help calculate the tilt.
- Orange Meteors have a value of 1 and can appear on both sides of the arena.
- Blue Meteors have a value of 3 and will only appear on one side.
The best approach to this mechanic is to always move towards the opposite side of any Blue Meteors and stand at the very edge before the arena tilts.
- Players must also be mindful of the ice puddle left behind by The Third Demiruge during Phase 2. Before the scales tip, it is best to position yourself so that you don’t slide through the puddle.
- Lastly, when Sophia reaches 15% health or less, she will spawn another Second Demiruge (healer-add) with the same abilities from Phase 2. However, despite being a healer, it cannot heal the boss. Depending on overall DPS, the group must decide between nuking the add to reduce the threat of its gaze attack, or have the off-tank move it away while the group focuses on Sophia to end the fight.
Loot
- Sophia Card
Guides & Tips
- Anger of a Moronto — Lost Ark
- FFXIV Pactmaker’s Awl
- FUT 22 Headliners Team 1 FIFA Team 2 Leak Upgrade
- D2R Grief Runeword
- Hipster Skins – Bard Soulfist Lost Ark
- Ambition’s End — Lost Ark
- Reflection of Azurite PoE
- FIFA 23 Defending Controls
- Lesser Eldritch Ichor PoE Eldritch Currency
- NBA 2K22 Best Rookies MyTEAM Top 5
- Giant Life Flask PoE Recipe Vendor
- Awakened Curse On Hit Support PoE
- Anomalous Swiftbrand Support PoE
- Undecember Diamond
- Advanced Traps Support PoE