| Name | Description |
|---|---|
| Name | The Emissary |
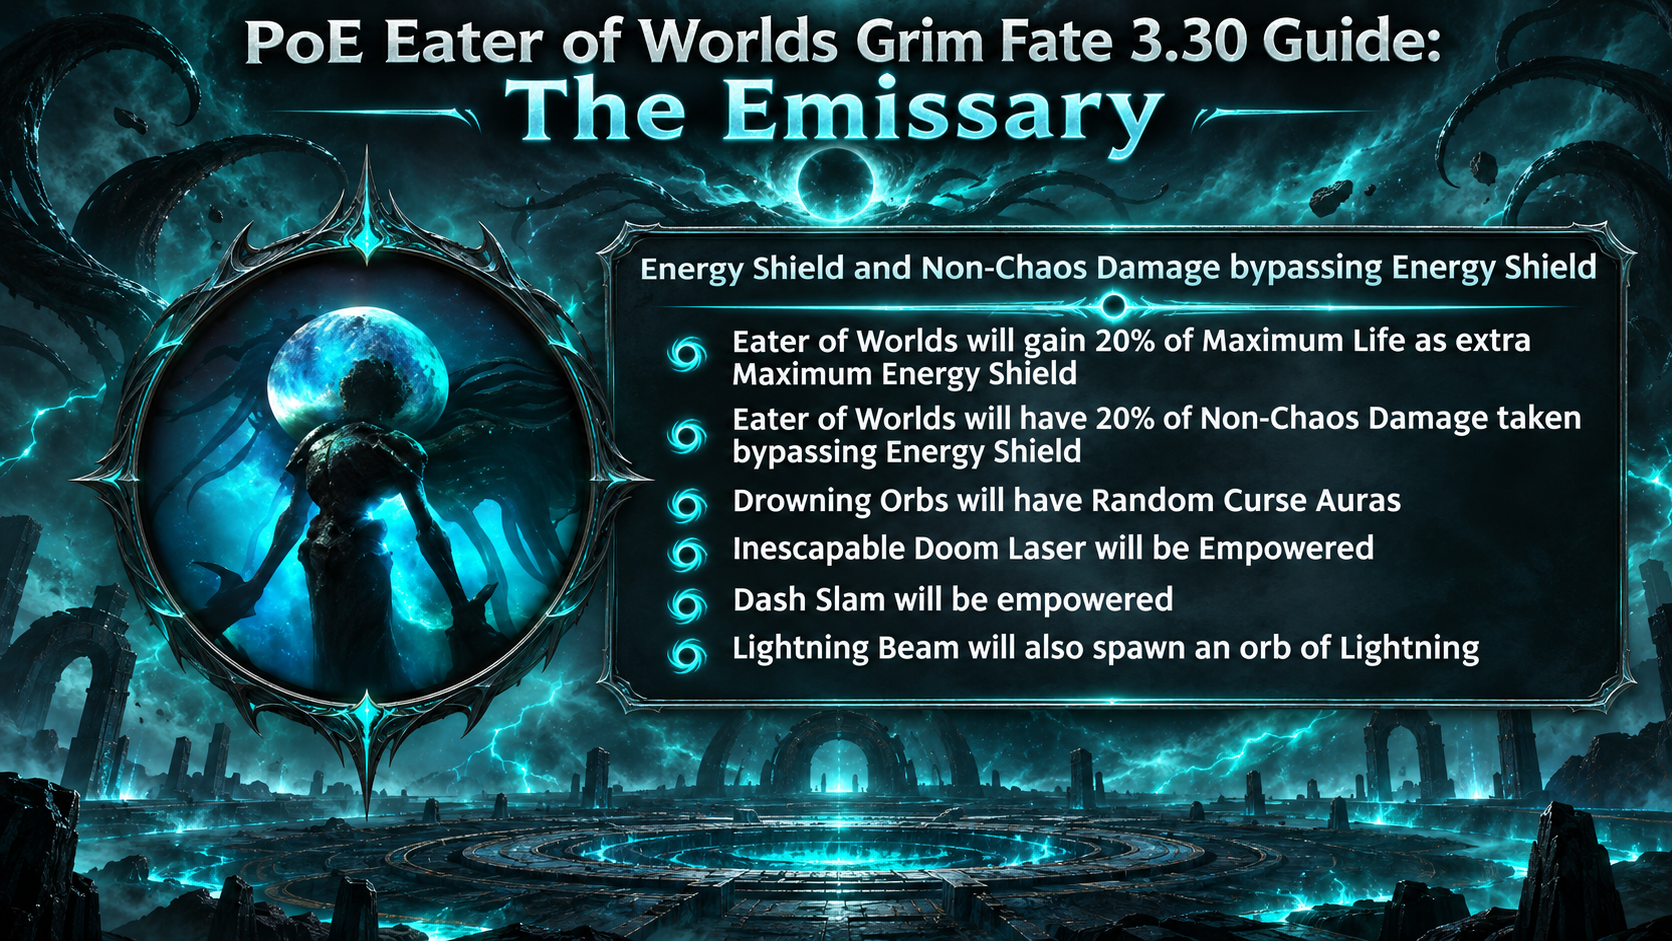
| description | The Emissary gives the Eater of Worlds extra Energy Shield and makes several of its arena attacks more dangerous. |
| Long Description | The Eater of Worlds gains 20% of its maximum Life as extra maximum Energy Shield. It also makes 20% of its non-Chaos damage bypass Energy Shield. Drowning Orbs gain random Curse Auras, the Inescapable Doom Laser and Dash Slam are empowered, and the Lightning Beam spawns an additional Lightning Orb. |
The Emissary makes the Eater of Worlds harder to kill and raises the pressure on Energy Shield builds. Its added Energy Shield extends the fight, while its damage-bypass effect means your Energy Shield cannot absorb all of the Eater’s non-Chaos damage. Its random Curse Auras and empowered attacks also make arena positioning more important.
Preparing for the fight
The Eater’s attacks deal mostly Lightning damage, so cap your Lightning Resistance and bring enough Life or Energy Shield to survive a hit. The Emissary makes a pure Energy Shield buffer less dependable against the Eater: 20% of its non-Chaos damage bypasses Energy Shield. Keep a meaningful Life pool and use reliable damage mitigation as well.
The boss also gains extra Energy Shield, so expect to spend longer attacking it. Prioritize steady damage and avoid dangerous invitation modifiers that can further increase its effective defenses.
How to defend against The Emissary
- Keep moving and watch the Drowning Orbs. Touching one inflicts Drowning, which slows your action speed and can kill you if you do not move away. The Emissary adds random Curse Auras to these orbs, so avoid lingering near them and leave their area promptly.
- Dodge the empowered Dash Slam. Watch the Eater’s movement and move out of its landing area. Save a movement skill for when ordinary movement will not clear the attack in time.
- Treat the Lightning Beam as a two-part hazard. Move away from the beam’s path, then look for the additional Lightning Orb it spawns. Don’t dodge the beam into another attack or into an orb.
- Keep circling during “Inescapable Doom!” The laser tracks you and its area grows. Move around the arena while activating Maven’s spheres; standing still to attack is a poor trade. The laser also applies a debuff that increases the damage you take.
- Respect the slam tells. The Eater’s sphere slam is especially dangerous at close range. When it glides toward you and begins channeling, move clear of the impact area; be ready for a repeat.
- Use damage windows efficiently. Attack while the Eater is vulnerable, but stop to reposition when a major tell or arena hazard demands it. Staying alive preserves more damage uptime than forcing attacks through a dangerous mechanic.
How to defeat the Eater of Worlds
The fight rewards controlled movement. Keep a clear route around the arena, avoid Drowning Orbs, and use your movement skill to escape the empowered slam or reposition during the Doom phase. When the Eater channels its Lightning Beam, dodge first and then account for the orb that appears afterward.
During the Doom phase, prioritize activating the spheres while continuing to move away from the tracking laser. If you fail to activate them in time, the Eater unleashes a powerful arena-wide attack.
The Emissary’s added Energy Shield makes damage uptime valuable, but survival comes first. A character that avoids the main attacks and keeps moving through the arena can finish the fight more reliably than one that stands still to squeeze in a few extra hits.
Using Fates
In campaign areas and maps, the Coven Queen’s darkness immobilizes unique bosses until you invoke Fates to release them. You can invoke up to two Fates during the campaign; a third slot becomes available automatically in maps. Each Fate changes the boss encounter and adds rewards. Some rewards apply individually, while combo rewards require at least two or three Fates with the same reward marker. Extra matching Fates may contribute toward another reward.
Defeating a Fate-empowered boss can drop Viscera associated with that boss. Place Viscera on the Wickerman to gain its stats.
Fates have tiers shown by one, two, or three feather symbols. Higher-tier Fates provide a greater item rarity bonus and add more dangerous effects. Fates found during the campaign are Tier 1; those found in maps are Tier 2.
Invoking duplicate Fates can upgrade the Fate’s tier and multiply its rewards. Under the 3.30.0b Hotfix 3 rules, you can invoke three copies of the same Fate: the first and third copies have their rewards tripled, while the second copy is ignored. This replaced the earlier restriction that prevented using the same Fate three times.
In the endgame, a random Grim Fate can sometimes be claimed when defeating an empowered map boss in a Tier 16 map. Unlike regular Fates, Grim Fates are retained at the Wickerman and can empower specific Atlas pinnacle bosses. These encounters can drop Pinnacle Boss Viscera with exclusive stats based on their associated unique items, as well as the Cursed Poppet used to fight the Coven Queen. Activate a Grim Fate from the Atlas of Worlds, similarly to using Maven’s beacon to witness a boss.
List of rewards
| Reward type | Combo | Description |
|---|---|---|
| Currency | 1 | Empowered Boss will drop additional Currency Items |
| Currency | 2 | Empowered Boss will drop additional Currency Items (Area Level 81+) |
| Currency | 3 | Empowered Boss will drop additional Valuable Currency Items |
| Maps | 1 | Empowered Boss will drop an additional Rare Map |
| Maps | 2 | Empowered Boss will drop many additional Rare Maps |
| Threads | 1 | Empowered Boss will drop additional Threads |
| Threads | 2 | Empowered Boss will drop many additional Threads |
| Threads | 2 | Empowered Boss will drop many additional Threads |
| Stacked Decks | 1 | Empowered Boss will drop additional Stacked Decks |
| Stacked Decks | 2 | Empowered Boss will drop many additional Stacked Decks |
| Gems | 1 | Empowered Monster will drop additional Gems with Quality |
| Gems | 1 | Empowered Monster will drop additional Gems, some of which will be maximum Quality |
| Gems | 2 | Empowered Monster will drop additional Gems, some of which will be maximum Quality |
| Gems | 2 | Empowered Monster will drop additional Gems with maximum Quality (Area Level 81+) |
| Exceptional Gem | 3 | Empowered Monster will drop an additional Exceptional Gem |
| Unique Weapon | 1 | Empowered Boss will drop an additional Unique Weapon |
| Unique Weapon | 1 | Empowered Boss will drop an additional Valuable Unique Weapon (T3+) |
| Unique Armour | 1 | Empowered Boss will drop an additional Unique Armour |
| Unique Armour | 1 | Empowered Boss will drop an additional Valuable Unique Armour (T3+) |
| Unique Jewellery | 1 | Empowered Boss will drop an additional Unique Jewellery |
| Unique Jewellery | 1 | Empowered Boss will drop an additional Valuable Unique Jewellery Item (T3+) |
| Unique Jewel | 2 | Empowered Boss will drop an additional Unique Jewel |
| Unique Flask | 1 | Empowered Boss will drop an additional Unique Flask |
| Corpse Rose | 2 | Empowered Monster will drop Corpse Rose |
| Hide of the Vendigo | 2 | Empowered Monster will drop Hide of the Vendigo |
| Ordered Fate | 2 | Empowered Monster will drop Ordered Fate |
| Doedre’s Tongue | 2 | Empowered Monster will drop Doedre’s Tongue |
| Dreadmaidens’ Sacrament | 2 | Empowered Monster will drop Dreadmaidens’ Sacrament |
| Viscera | 2 | Empowered Monster will drop a Viscera Item (+100%) |
| Gold | 1 | Empowered Boss will drop additional Gold |
| Gold | 2 | Empowered Boss will drop hoards of Gold |
| Rarity | 1 | Empowered Boss has greatly increased item Rarity (+50%) |
| Rarity | 2 | Empowered Boss has massively increased item Rarity (+80%) |
| Rarity | 3 | Empowered Boss has extremely increased item Rarity (+120%, Area Level 80+) |
| Fated Items (Block) | 1 | Empowered Monster will drop additional Rare <Item Class>; <Item class> dropped by Empowered Monster will have no <modifier tag> modifiers |
| Fated Items (Guarantee) | 1 | Empowered Monster will drop additional Rare <Item Class>; <Item class> dropped by Empowered Monster will have a <modifier tag> modifier |
About the Author