The Hive Lord in Helldivers 2 is one of the most intimidating enemies you’ll ever face. Towering above Bile Titans and capable of wiping squads in seconds, this colossal worm-like Terminid was introduced with the Into the Unjust update. While most squads wisely avoid it, determined Helldivers can bring it down—with the right plan, weapons, and teamwork.
Overview: What is a Hive Lord?
- Size & Role: A massive subterranean worm that erupts from the ground in wide, open maps.
- Appearance Conditions: Found mainly in mobile extraction missions on Hive Worlds. Caves are too small, so you won’t see one there.
- Health & Armor: Estimated at over 150,000 HP with heavy armor plating, making it one of the hardest enemies in the game.
- Threat Level: Comparable to a raid boss—treat it as a hazard rather than a mission objective.
Hive Lord Attacks
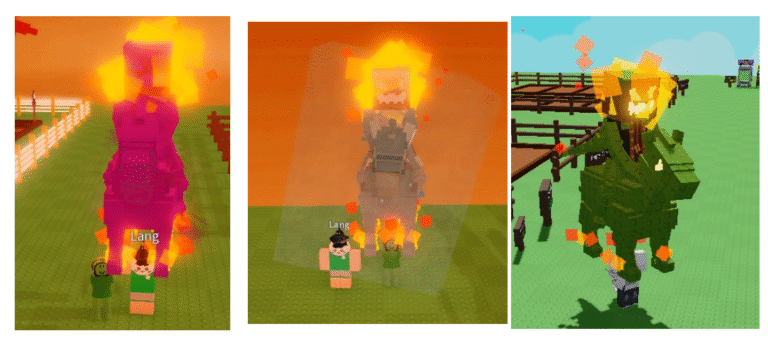
- Ground Ripples – A telltale sand wave shows its burrowing path. Being caught knocks you down.
- Ground Eruption – The worm bursts upward, damaging and scattering players.
- Falling Debris – Rocks rain down when it rises, causing knockback and damage.
- Bile Spray – Massive acid vomit that covers a huge area, far stronger than Bile Titan bile.
- Body Slam / Flatten – If you’re close and stationary, it flops over and crushes you instantly.
How to Survive Against the Worm
- Keep Moving: Staying still means death. Always dive, dodge, and reposition.
- Use Caves: They can’t follow you underground. If a Hive Lord spawns, retreat into a cave to reset.
- Treat It Like Terrain: Think of it more as an environmental hazard—focus on mission objectives unless your squad came prepared for a boss hunt.
If you’re determined to face a Hive Lord, make sure your squad is fully geared before the drop. Stock up on heavy weapons, coordinate your stratagems, and prepare for a long fight. And if you want the fastest way to be mission-ready, you can always buy Helldivers 2 super credits to unlock the gear you’ll need for survival.
How to Kill a Hive Lord
If you insist on worm blood, here’s the step-by-step plan:
1. Essential Loadout
- Portable Hellbombs (Servants of Freedom Warbond) – The most effective damage dealer.
- Anti-Tank Weapons:
- Recoilless Rifle
- Commando Launcher
- Expendable Anti-Tank
- Orbital Strikes: Orbital Railcannon, Eagle 500KG Bomb, or Orbital Laser.
2. Target Weak Spots
- Head and Mouth: The armored body shrugs off most hits. Aim for its fleshy mandibles and mouth to deal actual damage.
- Mandible Timing: When it rises and exposes its jaws, that’s your damage window.
3. Squad Coordination
- Team Roles:
- Two players focus on Hellbomb placements.
- One runs anti-tank fire.
- One manages stratagems and revives.
- Cooldown Rotation: Drop emplacements and Hellbombs in cycles to maintain pressure.
4. Endurance Fight
- Expect the fight to take 10–15 minutes minimum with a full squad. The worm can soak up 15 Hellbombs or more before dying.
- No guaranteed loot—victory is for bragging rights and glory.
The Hive Lord is not meant to be a regular target. Most missions will reward you more if you avoid it entirely. But if your squad is hungry for a challenge, well-coordinated use of Hellbombs, heavy anti-tank firepower, and orbital strikes can eventually bring it down. Just don’t expect it to be quick—or painless.