PoE Ultimatum Boss Guide: Defeat The Trialmaster
How to Spawn Ultimatum Boss?
The Trialmaster is back. This boss from Ultimatum and more importantly, the unique items he drops have been sorely missed and will be making a return as the Tower of Ordeals unique map in Lake of Kalandra. This map can be created by completing difficult endgame Vaal content.
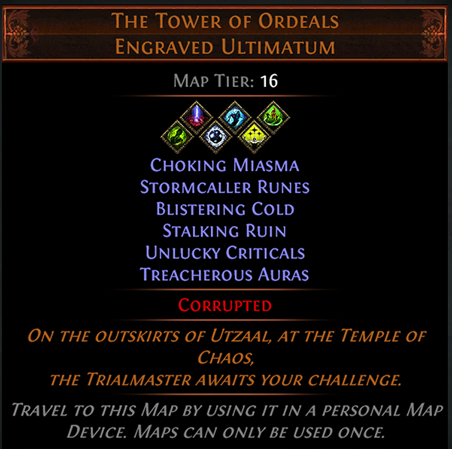
 The Tower of Ordeals Unique Map
In this map, you may challenge the Trialmaster and potentially earn unique items from the Ultimatum league. You can create this map by completing endgame Vaal content.
Boss: The Trialmaster List of Ultimatum Trials of Chaos Modifiers. Travel to this Map by using it in a personal Map Device. Maps can only be used once. Flavour text: On the outskirts of Utzaal, at the Temple of Chaos, the Trialmaster awaits your challenge. The Tower of Ordeals is not part of the Atlas of Worlds. There is no bonus objective for this map. GGG has not forgotten about the rest of Ultimatum and have a specific plan for how it will return in the future. |
 |
Buy PoE Currency Cheap
- Divine Orbs for Sale (6% off coupon: vhpg). Best site to buy PoE currency.
- Buy PoE Currency Instant Delivery (6% off coupon: poeitems). Path of Exile item and currency. Payment: PayPal, Skrill, Cryptocurrencies.
Defeat the Trialmaster
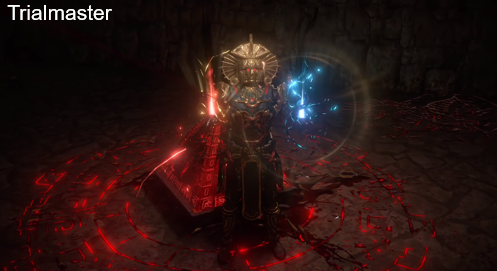
The Trialmaster is the boss of the Unique Map The Tower of Ordeals. He was also the featured NPC (and in the maps, unique boss) of Ultimatum league.
In Ultimatum league, he offered the Trials of Chaos (aka Ultimatum) to the player as directed by his master, Chaos. The Trialmaster had a chance to be encountered as a boss in the final tenth wave of the Trials, teleporting the player to special arena.
Abilities
- Abyss Slam: "Fall before me!" - Charges up, slamming the ground and launching a blue Ground Slam/Sunder in a direction
- Cyclone: Swings his weapon around while moving slowly towards the player for a duration
- Shockwave: "Feel his power!" - Charges up, slamming the ground and causing a red shockwave in an area
- Trialmaster's Heart: "Be still!" - Places his heart in the arena, linking via a chain (Trialmaster's Tether) to the player. Moving away from the Heart will sever the link, causing Physical Damage and always inflicting Stun with 250% increased duration
- Spear Pulse: "Chaos aid me!" - Fires a ground-targeted spear towards the player which causes a Physical nova
- Tri-Elemental Mortar: throws three projectiles, each doing Fire/Cold/Lightning damage
- Spike Mortar: throws five projectiles dealing Physical damage
- Omega Projectile: Fires a large blue orb that bounces off the arena's walls, exploding on impact
- Timestop Slam: "Ultimatum!" - Pauses time, teleporting and slamming the ground three times, causing delayed red Sunders
- Timestop Projectiles: "Might of Chaos!" Pauses time, teleporting and creating three blood orbs that bounce off the arena's walls, exploding on impact
- Hostile Currency: "Take it. Go ahead." - Summons interactable Chaos Orbs and Vaal Orbs around the arena which drop their respective items when clicked
Drops
- Glimpse of Chaos
- Hateforge
- Mahuxotl's Machination
- Relic of the Pact
- Temptation Step
- Yaomac's Accord
How to Spawn Ultimatum Boss? Ultimatum League
- Location: Level 78+ in endgame maps, wave 10
- the Trialmaster spawns 1 time in 50 maps
It's worth noting that The Trialmaster (wave 10) can only start showing up at area levels 78 and above.
The completion rate of the Trialmaster encounter is only 60%! Part of this could be attributed to the fact that players may have only fought him a few times and are still learning the encounter as they go, though the Trialmaster is a fairly difficult encounter for most, as many of his abilities can be extremely dangerous, particularly when you factor in map modifiers and Ultimatum modifiers.
64.39% of all generated Trialmaster encounters were never even started. What this means is that players either failed an encounter prior to wave 10, took their rewards prior to wave 10 or didn't start the Ultimatum encounter altogether. When we look at the best case scenario where the Trialmaster spawns 1 time in 50 maps and then factor in the realised encounter rate (35.61%), we see that the average player in level 78 or higher maps is actually fighting the Trialmaster 1 time in 140 maps. Some players have said that they feel the Trialmaster is too rare. Our investigation while generating these stats showed that those players are often not playing through to wave 10, failing encounters, or not even starting the encounter to begin with.
Defeat Ultimatum Boss - Trialmaster’s Domain: Double or Nothing
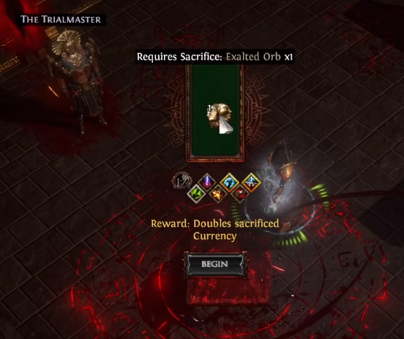
In the endgame, ![]() Inscribed Ultimatums indicate an offering you must bring to the Trialmaster’s Domain. If you’re able to succeed at the inscribed challenge, the Trialmaster will reward you with an item of roughly double value. But if you fail, you forfeit the offering that you put on the line. Inscribed Ultimatums come with a challenging assortment of Ultimatum difficulty modifiers and can be traded to other players.
Inscribed Ultimatums indicate an offering you must bring to the Trialmaster’s Domain. If you’re able to succeed at the inscribed challenge, the Trialmaster will reward you with an item of roughly double value. But if you fail, you forfeit the offering that you put on the line. Inscribed Ultimatums come with a challenging assortment of Ultimatum difficulty modifiers and can be traded to other players.
Trialmaster's Drops
- Yaomac's Accord Vaal Sceptre
As the difficulty of the Trialmaster’s encounters escalates, so too do the rewards. In addition to some of Path of Exile’s most valuable items, you might be offered new Ultimatum-exclusive Unique items.
PoE has designed Ultimatum league to be very compatible with party play – each player gets their own rewards, can vote on difficulty modifiers and can choose whether they want to risk the next round or not.
The Trialmaster
In the Ultimatum Challenge League, you'll test your skills in the trials of Chaos. In every area, you'll encounter The Trialmaster who will present you with a reward, objective and choice of three modifiers that add extra challenge to the encounter.
If you're successful, you must then choose between accepting the reward you've earned or attempting additional trials with increased difficulty in the hopes of earning additional rewards. Choose wisely, because if you fail, you'll lose all the rewards you've earned so far. Each encounter with the Trialmaster provides a series of trials with increasing difficulty.
In maps, you'll occasionally find ![]() Inscribed Ultimatums which can be placed in the map device to transport you to the Trialmaster's domain. Each Inscribed Ultimatum specifies an offering that you must bring with you, a reward you can earn and an assortment of Ultimatum difficulty modifiers. If you're able to complete the Trial, you'll earn the specified reward. However, if you fail, you'll forfeit the offering you brought with you.
Inscribed Ultimatums which can be placed in the map device to transport you to the Trialmaster's domain. Each Inscribed Ultimatum specifies an offering that you must bring with you, a reward you can earn and an assortment of Ultimatum difficulty modifiers. If you're able to complete the Trial, you'll earn the specified reward. However, if you fail, you'll forfeit the offering you brought with you.
Trialmaster’s Trial: Risk it All
The Trialmaster offers you a reward and a challenge with three difficulty modifiers to choose from. There are four possible objectives:
- Defeat waves of enemies: You need to kill a certain number of enemies to get success.
- Survive: Don't die until the timer runs out.
- Stand in Stone Circles: You must stand in each stone circle for a certain period of time.
- Protect the Altar: Kill enough enemies without letting the altar be destroyed.

If you succeed in his trial, you may claim your reward. However, you’ll be presented with an Ultimatum: leave with your spoils, or attempt more challenging encounters for more valuable rewards.

But be careful how many trials you undertake – if you fail, you’ll lose everything you’ve earned so far.
Ultimatum Trials of Chaos Modifiers
Player need to select a mod to increase the difficulty of the trial, and then perform various Challenge Types. After finish a wave successfully, player can choose to leave the trial with the loot, or enter the next wave. But be careful how many trials you undertake - if you fail, you'll lose everything you've earned so far.
| Icon | Name | Failure Rate (Level 2-72) |
Failure Rate (Level 73-77) |
Failure Rate (Level 78+) |
Stats |
|---|---|---|---|---|---|
 |
Ailment and Curse Reflection | 17.01% | 14.87% | 12.99% | Curses and Non-damaging Ailments you apply are Reflected |
 |
Blistering Cold | 7.73% | 6.40% | 5.63% | Frozen pustules will periodically appear and explode when you approach |
|
Blistering Cold II | 7.53% | 7.18% | 6.47% | Many frozen pustules will periodically appear and rapidly explode when you approach |
|
Blistering Cold III | 12.05% | 12.17% | 11.39% | Many frozen pustules will periodically appear, chill you, and rapidly explode when you approach |
 |
Bonus Chaos Damage | 15.18% | 16.36% | 13.30% | Monsters deal 30% of Physical Damage Added as Chaos Damage |
 |
Buffs Expire Faster | 13.23% | 13.81% | 12.62% | Buffs expire three times faster on players |
 |
Choking Miasma | 7.63% | 6.14% | 5.20% | A cloud that deals Chaos Damage over Time will follow you |
|
Choking Miasma II | 6.35% | 5.91% | 4.83% | A large cloud that deals Chaos Damage over Time will follow you |
|
Choking Miasma III | 9.06% | 9.21% | 8.24% | A large and fast cloud that deals Chaos Damage over Time will follow you |
 |
Escalating Damage Taken | 18.88% | 21.76% | 20.16% | For the remainder of the encounter, damage taken will slowly increase by 1% per second, up to 50% |
 |
Escalating Monster Speed | 15.11% | 14.79% | 12.67% | All Monsters gain 2.5% increased attack, cast, and movement speed per second they are alive, up to 50% |
 |
Hindering Flasks | 15.45% | 13.28% | 9.24% | Using a Flask Hinders you by 50% for 4 seconds |
 |
Less Cooldown recovery | 15.94% | 17.49% | 17.02% | Cooldowns take five times longer to recharge |
 |
Lessened Reach | 15.70% | 16.25% | 14.78% | Players have 50% less Area of Effect and Projectile Speed |
 |
Lightning Damage from Mana Costs | 13.54% | 12.14% | 11.08% | Take 50% of Mana costs as Lightning Damage |
|
Lightning Damage from Mana Costs II | 10.98% | 10.98% | 10.98% | Take 200% of Mana costs as Lightning Damage |
|
Lightning Damage from Mana Costs III | 11.72% | 1.72% | 1.72% | Take 1000% of Mana costs as Lightning Damage |
 |
Limited Arena | 9.82% | 10.14% | 8.91% | The encounter area will be much smaller |
 |
Limited Flasks | 18.02% | 21.12% | 23.37% | Using a Flask removes any existing Flask effects |
 |
Occasional Impotence | 16.62% | 18.56% | 17.51% | You and your Minions deal no damage for 2 seconds every 8 seconds |
 |
Raging Dead | 8.71% | 6.64% | 6.23% | Skulls will appear that spit Fire if you remain near them |
|
Raging Dead II | 7.07% | 6.52% | 6.35% | Many skulls will appear that spit Fire if you remain near them |
|
Raging Dead III | 15.11% | 14.05% | 14.07% | Many skulls will appear that pursue you and spit Fire when near you |
 |
Random Projectiles | 15.21% | 15.11% | 13.41% | Your Projectiles fly in random directions Monsters fire additional Projectiles |
 |
Razor Dance | 6.89% | 5.61% | 4.31% | Blades will periodically appear and fly at you, applying Corrupted Blood on Hit |
|
Razor Dance II | 5.01% | 4.68% | 3.78% | Many blades will periodically appear and fly at you, applying Corrupted Blood on Hit |
|
Razor Dance III | 6.99% | 7.68% | 7.27% | Swarms of blades will periodically appear and fly at you, applying Corrupted Blood on Hit |
 |
Reduced Recovery | 13.09% | 12.95% | 11.46% | 30% Reduced Life, Mana, and Energy Shield Recovery Rate |
 |
Restless Ground | 8.85% | 7.15% | 5.76% | Patches of Unhallowed Ground will appear that Hinder players and cause slain Monsters to resurrect as Phantasms |
|
Restless Ground II | 8.99% | 8.93% | 7.16% | Many patches of Unhallowed Ground will appear that Hinder players and cause slain Monsters to resurrect as Phantasms |
|
Restless Ground III | 12.02% | 12.65% | 9.94% | Many patches of Unhallowed Ground will appear that Hinder players and cause slain Monsters to resurrect as Ruin-inflicting Phantasms Fail on reaching 7 Ruin |
 |
Ruin | 7.17% | 5.98% | 4.91% | A Monster type will apply Ruin with its special ability Fail on reaching 7 Ruin |
|
Ruin II | 5.06% | 5.01% | 4.04% | A Monster type will apply double Ruin with its special ability Fail on reaching 7 Ruin |
|
Ruin III | 11.06% | 11.22% | 9.68% | Two Monster types will apply double Ruin with their special abilities Fail on reaching 7 Ruin |
 |
Siphoned Charges | 17.40% | 15.93% | 14.16% | Lose a Power, Frenzy, and Endurance Charge every second Monsters gain Power, Frenzy, and Endurance Charges on hit |
 |
Stalking Ruin | 8.87% | 6.41% | 5.23% | An invulnerable shade stalks you, inflicting Ruin with its Melee Attacks Fail on reaching 7 Ruin |
|
Stalking Ruin II | 6.80% | 5.13% | 4.20% | An invulnerable shade stalks you, gaining speed and inflicting Ruin with Melee Attacks and Spells Fail on reaching 7 Ruin |
|
Stalking Ruin III | 12.13% | 9.96% | 8.85% | An invulnerable shade stalks you, gaining further speed and inflicting Ruin with Melee Attacks and powerful Spells Fail on reaching 7 Ruin |
 |
Stormcaller Runes | 8.19% | 7.85% | 7.92% | Runes will appear that will call deadly Lightning storms if you remain in them |
|
Stormcaller Runes II | 8.17% | 10.70% | 12.48% | Large runes will appear that will call deadly Lightning storms if you remain in them |
|
Stormcaller Runes III | 13.37% | 18.05% | 20.17% | Many large runes will appear that will call deadly Lightning storms if you remain in them |
 |
Totem of Costly Might | 14.82% | 13.81% | 12.13% | An invulnerable Totem will appear that imbues both its allies and its enemies with Speed and powerful Physical Damage benefits, but causes enemies to take 10% of their maximum Life and Energy Shield as Physical Damage per second |
 |
Totem of Costly Potency | 15.84% | 14.45% | 12.62% | An invulnerable Totem will appear that imbues both its allies and its enemies with Speed and powerful Elemental Damage benefits, but causes enemies to take 15% of their maximum Life and Energy Shield as Fire Damage per second |
 |
Treacherous Auras | 13.20% | 12.93% | 11.83% | Your Auras that affect Allies also affect Enemies |
 |
Unlucky Criticals | 13.02% | 13.02% | 11.48% | Your Critical Strike Chance is Unlucky |
Challenges: Defeat The Trialmaster Conditionally(4)
Complete each of the following encounters.
- Defeat The Trialmaster without any player being hit by Blood Orb
- Defeat The Trialmaster without any player being hit by Spear Pulse
- Defeat The Trialmaster after collecting all of his hostile currency
- Defeat The Trialmaster while affected by Trialmaster's Tether and without any player being hit by the Trialmasters Heart
In end-game, The Trialmaster is a combatable boss monster. He can be encountered in the final wave of the Trials by chance.
At red tier maps, there is a chance to be offered a 10th wave, which teleports you to a boss arena to fight the Trialmaster. (1% chance at T11-13, 2% at T14+).
Effects from modifiers
- Monster gives 100% increased Experience on death (Hidden)
- 1500% increased Quantity of Items dropped by this Monster (Hidden)
- 2000% increased Rarity of Items dropped by this Monster (Hidden)
- Cannot be fully Slowed
- Cannot be Knocked Back (Hidden)
The Trialmaster Skills(Level 84)
| Skill Name | Stats | Cast Time |
|---|---|---|
| TrialmasterBossMeleeKnockback |
Default Attack Strike your foes down with a powerful blow. base_knockback_speed_+% 100% increased Knockback Distance Deals 50% less Attack Damage skill_can_fire_arrows skill_can_fire_wand_projectiles action_attack_or_cast_time_uses_animation_length global_knockback determine_knockback_direction_from_melee_pattern Attack ProjectileAttack SkillCanMirageArcher Projectile MeleeSingleTarget AttackCanRepeat Melee SkillCanVolley |
Cast Time: 1 Second |
| GATrialMasterBossCleave | is_area_damage Triggerable | Cast Time: 1 Second Cooldown Time: 5 Second |
| GATrialMasterBossSlamSpikeNova | is_area_damage Triggerable | Cast Time: 1 Second Cooldown Time: 8 Second |
| GATrialMasterBossSlamShockwave | monster_penalty_against_minions_damage_+%_final_vs_player_minions Deals 25% more Attack Damage is_area_damage Triggerable |
Cast Time: 1 Second Cooldown Time: 8 Second |
| TrialMasterBossAbyssSlam | main_hand_base_maximum_attack_distance Causes 10 Bursts Fires 4 additional Projectiles total_projectile_spread_angle_override is_area_damage Attack Hit Area Triggerable |
Cast Time: 1 Second Cooldown Time: 8 Second |
| EASTrialMasterBossElementalMortar | Cast Time: 1.8 Second | |
| TrialMasterBossOmegaProjectile | monster_projectile_variation Chains +4 Times Projectiles can Chain when colliding with terrain 500% increased Chaining range Projectile Range is Limited number_of_projectiles_override base_is_projectile use_scaled_contact_offset projectile_uses_contact_position maintain_projectile_direction_when_using_contact_position skill_cannot_chain_from_enemies cannot_pierce Spell Projectile SkillCanVolley Triggerable |
Cast Time: 2.5 Second Cooldown Time: 8 Second |
| TrialMasterBossThrowWeapon | +50 to Melee Strike Range number_of_projectiles_override base_is_projectile action_attack_or_cast_time_uses_animation_length use_scaled_contact_offset projectile_uses_contact_position maintain_projectile_direction_when_using_contact_position Triggerable |
Cast Time: 1 Second |
| EAATrialMasterSummonSpear | +50 to Melee Strike Range action_attack_or_cast_time_uses_animation_length |
Cast Time: 1 Second |
| MMSTrialMasterBossFireMortar | Generic monster mortar skill. Like Monster Projectile but has an impact effect. projectile_spread_radius Deals 2225 to 3338 Fire Damage is_area_damage base_is_projectile projectile_uses_contact_position Projectile SkillCanVolley Spell Hit Area SkillCanTrap SkillCanTotem SkillCanMine SpellCanRepeat Triggerable AreaSpell |
Cast Time: 1 Second |
| MMSTrialMasterBossColdMortar | Generic monster mortar skill. Like Monster Projectile but has an impact effect. projectile_spread_radius Deals 2225 to 3338 Cold Damage is_area_damage base_is_projectile projectile_uses_contact_position Projectile SkillCanVolley Spell Hit Area SkillCanTrap SkillCanTotem SkillCanMine SpellCanRepeat Triggerable AreaSpell |
Cast Time: 1 Second |
| MMSTrialMasterBossLightningMortar | Generic monster mortar skill. Like Monster Projectile but has an impact effect. projectile_spread_radius Deals 834.4 to 4728 Lightning Damage is_area_damage base_is_projectile projectile_uses_contact_position Projectile SkillCanVolley Spell Hit Area SkillCanTrap SkillCanTotem SkillCanMine SpellCanRepeat Triggerable AreaSpell |
Cast Time: 1 Second |
| TrialmasterTetherSpike | Deals 1518 to 2277 Physical Damage Wall will be 37 units long geometry_attack_length grasping_vines_movement_speed_+%_final geometry_attack_width 250% increased Stun Duration on enemies monster_penalty_against_minions_damage_+%_final_vs_player_minions always_stun |
Cast Time: 2.5 Second Cooldown Time: 10 Second |
| TrialmasterChaosShrine | Deals 876 to 1314 Physical Damage Base secondary duration is 1 seconds +19 to radius orion_circle_maze_number_of_circles monster_penalty_against_minions_damage_+%_final_vs_player_minions is_area_damage |
Cast Time: 2 Second Cooldown Time: 10 Second |
| MMSTrialMasterBossSpikeMortar | Generic monster mortar skill. Like Monster Projectile but has an impact effect. Deals 490.6 to 735.8 Physical Damage Fires 5 additional Projectiles projectile_spread_radius projectile_speed_is_divided_by_%_of_scale is_area_damage base_is_projectile projectile_uses_contact_position projectiles_nova Projectile SkillCanVolley Spell Hit Area SkillCanTrap SkillCanTotem SkillCanMine SpellCanRepeat Triggerable AreaSpell |
Cast Time: 1 Second |
| SSMTrialmasterFirecrackerDaemon | number_of_monsters_to_summon alternate_minion summon_specific_monsters_radius_+% summoned_monsters_are_minions monster_no_drops_or_experience minion_dies_when_parent_dies minion_dies_when_parent_deleted Spell SpellCanRepeat Triggerable |
Cast Time: 1 Second |
| GATrialMasterBossShockwaveTrigger | is_area_damage Triggerable | Cast Time: 1 Second |
| TrialmasterTimestopSlam | Spell Repeats 2 times leap_slam_minimum_distance +80 to radius base_deal_no_damage |
Cast Time: 2.5 Second |
| TrialmasterTimestopProjectile | Spell Repeats 2 times leap_slam_minimum_distance +80 to radius base_deal_no_damage |
Cast Time: 2 Second |
| TrialmasterCyclone |
Cyclone Channel this skill to move towards a targeted location while spinning, building up stages while constantly attacking enemies in an area around you. While channelling this skill, you cannot be knocked back. 100% more Movement Speed monster_penalty_against_minions_damage_+%_final_vs_player_minions Deals 34% less Attack Damage is_area_damage Attack Area Melee MovementSkill Type65 Channelled PhysicalSkill |
Cast Time: 1 Second |
| TeleportTrialMasterBoss | skill_cannot_be_interrupted skill_cannot_be_stunned skill_cannot_be_knocked_back Spell | Cast Time: 1.5 Second Cooldown Time: 10 Second |
| TrialMasterCycloneBegin | +30 to Melee Strike Range | Cast Time: 2 Second Cooldown Time: 7 Second |
| TrialMasterBossAbyssSlamRuin | main_hand_base_maximum_attack_distance Causes 10 Bursts Fires 4 additional Projectiles total_projectile_spread_angle_override is_area_damage apply_ultimatum_ruin_on_hit Attack Hit Area Triggerable |
Cast Time: 1 Second Cooldown Time: 8 Second |
| GATrialMasterBossCleaveRuin | is_area_damage apply_ultimatum_ruin_on_hit Triggerable | Cast Time: 1 Second Cooldown Time: 5 Second |
| TrialMasterBossOmegaProjectileRuin | monster_projectile_variation Chains +4 Times Projectiles can Chain when colliding with terrain 500% increased Chaining range Projectile Range is Limited number_of_projectiles_override base_is_projectile use_scaled_contact_offset projectile_uses_contact_position maintain_projectile_direction_when_using_contact_position apply_ultimatum_ruin_on_hit skill_cannot_chain_from_enemies cannot_pierce Spell Projectile SkillCanVolley Triggerable |
Cast Time: 2.5 Second Cooldown Time: 8 Second |
| GSTrialMasterBossOmegaProjectileExplode | Deals 1656 to 2024 Physical Damage monster_penalty_against_minions_damage_+%_final_vs_player_minions is_area_damage Triggerable |
Cast Time: 1 Second |
| GSTrialMasterBossOmegaProjectileExplodeRuin | Deals 1656 to 2024 Physical Damage monster_penalty_against_minions_damage_+%_final_vs_player_minions is_area_damage Triggerable |
Cast Time: 1 Second |
| GSTrialMasterBossGroundSpearNova | Deals 1261 to 1892 Physical Damage monster_penalty_against_minions_damage_+%_final_vs_player_minions is_area_damage Triggerable |
Cast Time: 1 Second |
| GATrialMasterBossGroundSpearImpact | Deals 50% less Attack Damage is_area_damage Triggerable |
Cast Time: 1 Second |
| GATrialMasterBossSlamFrontal | Deals 10% more Attack Damage is_area_damage Triggerable |
Cast Time: 1 Second |
Level |
Name |
Experience |
Damage |
Attack Time |
Ally Life |
Armour |
Evasion |
Energy Shield |
Resists Fire |
Resists Cold |
Resists Lightning |
Resists Chaos |
|---|---|---|---|---|---|---|---|---|---|---|---|---|
| 84 | The Trialmaster | 57505 | 2860.6 | 1.5 | 121902 | 24242 | 8548 | 60951 | 50 | 50 | 50 | 30 |
Partying
When facing a Trial of Chaos with other players, each player will be offered their own individual set of rewards. When an individual player fails the trial, they will lose their rewards but the trial will continue with the remaining players.
In between waves, the players will vote on which modifier to add to the next wave. The one with the most votes gets added. In case of ties, a mod is randomly chosen between them. Players have a limited time to vote, but the timer is paused if at least one party member is not present in the zone.
Fortuitous Feud challenge: Defeat any three of the following bosses in the specified ways.
Defeat The Trialmaster after collecting all of his hostile currency
The Trialmaster is the Ultimatum final boss. The Trialmaster boss fight can be accessed through the newly introduced ![]() The Tower of Ordeals Unique Map.
The Tower of Ordeals Unique Map.
- Hostile Currency: "Take it. Go ahead." - Summons interactable Chaos Orbs and Vaal Orbs around the arena which drop their respective items when clicked
Trialsmaster will start spawning 5 hostile currency after 60 seconds of the fight, and these currencies will last for 10 seconds before they disappear, so try grab them as soon you see them to complete this challenge.
The key to completing this challenge is by listening to and waiting for when he says these lines- "Temptation to the fool" or "Take it. Go ahead" he will start spawning the currency you must click the currency on the ground. Pick up is optional.
Changes
PoE 3.14.1: Added a short grace period when being teleported to The Trialmaster's arena. Improved various visual effects in The Trialmaster encounter.
Path of Exile Guides & Tips
- Orlando Magic Roster NBA 2K23 Ratings Team Badges
- Anomalous Faster Casting Support PoE
- PoE Summon Greater Harbinger of Directions Skill Build 3.13
- PoE Axe Corruptions List, Corruption Mods, Corrupted Axes Implicit
- Divergent Arcane Surge Support PoE
- Torn Cloak PoE Heist Cloak – Reduce Alert Level
- Horticrafting Bud 3.11 – PoE Seed Enhancer Harvest
- 2 factors for cheap currency in PoE
- Divergent Vigilant Strike PoE
- Anomalous Storm Call PoE
- PoE Harvest 3.13 Changes in Echoes of the Atlas
- Putembo’s Valley PoE Price & Build – Topaz Ring
- PoE Belt Corruptions List, Corruption Mods, Corrupted Belt Implicit
- Replica Fencoil PoE Gnarled Branch
- Blastchain Mine Support PoE